Search
Close this search box.

Cash expenditure

Creating an expense

The cash expenditure must be created manually.

Web app

  1. My Finances – Expenses – Add Expense (top centre).
  2. Complete required details Save or Save and submit for approval.

Mobile app

  1. Once you have logged in, you are directly in Issues – click on Add button (bottom right).
  2. Take a picture of the receipt, edit and confirm with a pipe.
  3. Fill in the required information and Submit for approval

Deleting an expense

Web app

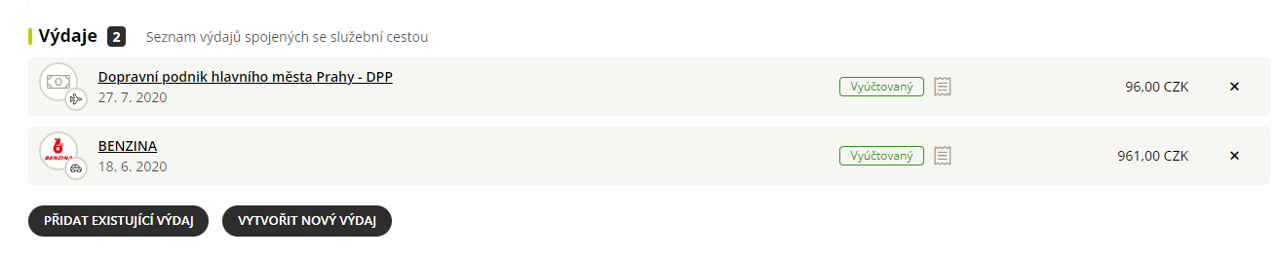
  1. My Finances – Expenses – click on the expense you want to delete.
  2. Click on , select Delete Expense and confirm with the Delete button .

Mobile app

  1. After logging in, you are directly in Expenses – click on the expense you want to delete.
  2. On the top right, select Delete Expense over the three dots and confirm with the Delete button.

Frequently asked questions about cash expenses

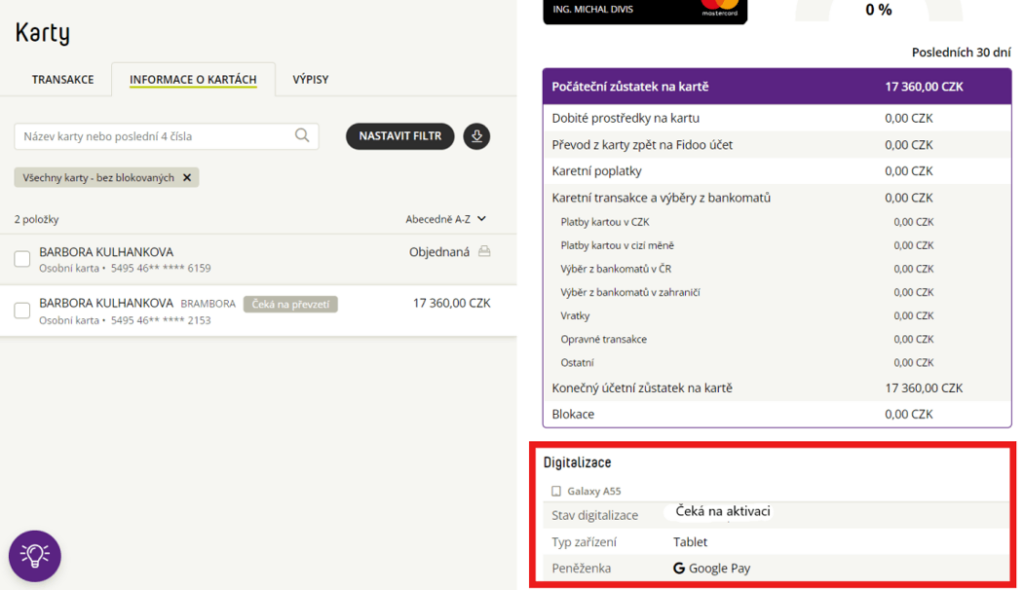
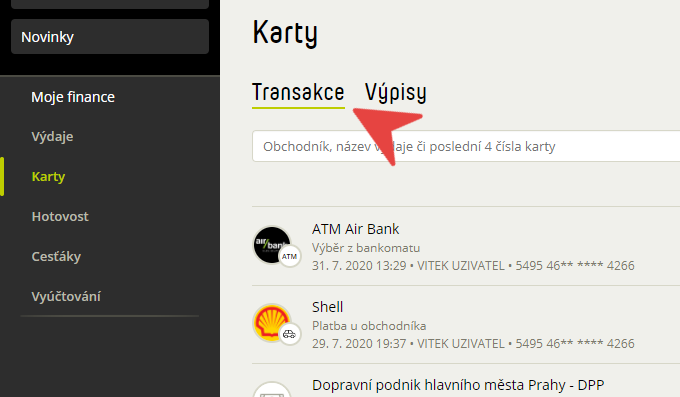
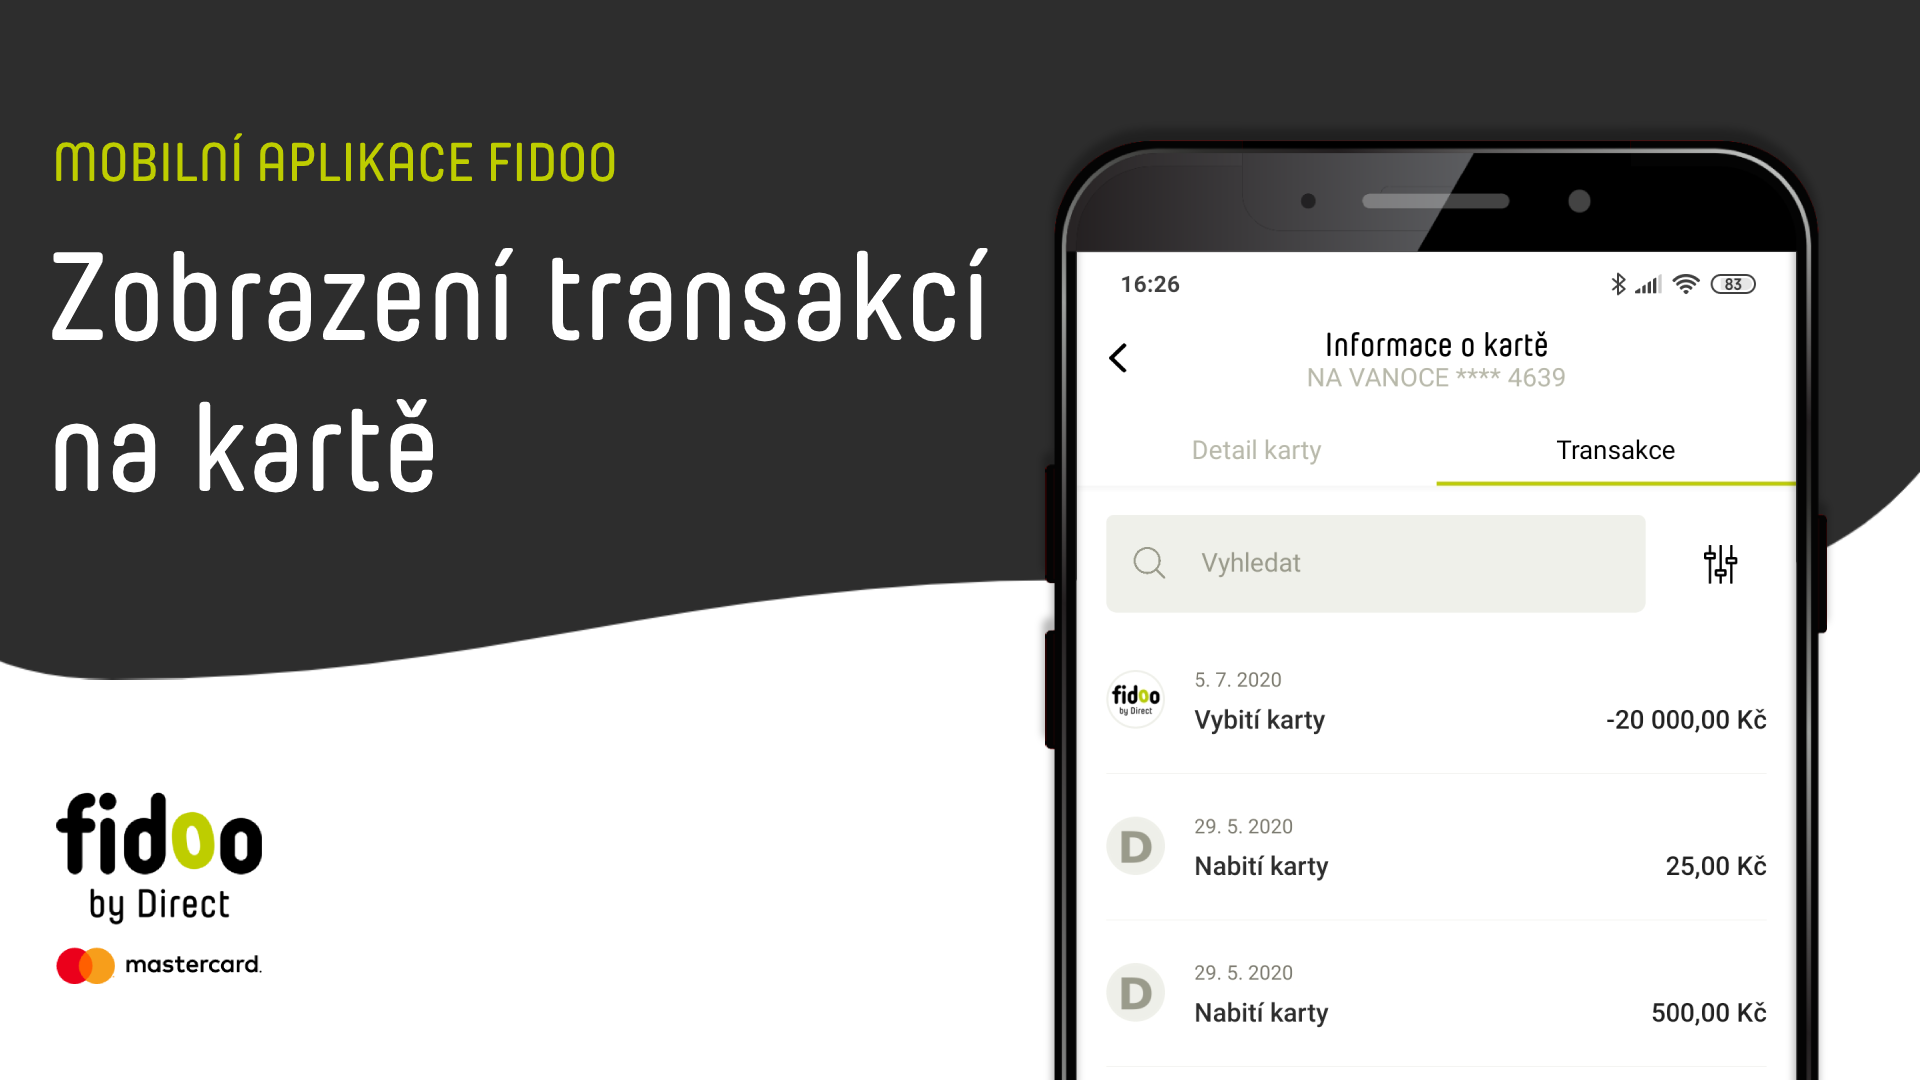
  • My Finances – Cash – Here you can find all your cash expenses and ATM withdrawals.
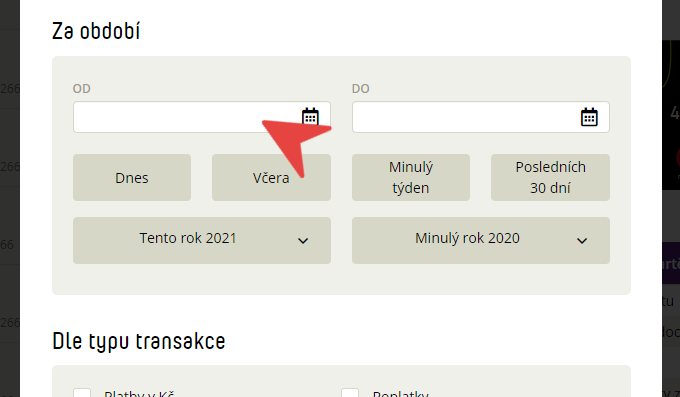
  • You can filter expenses using the Set filter button and download using the Download icon button.

In the cash wallet, you can see the current total amount including ATM withdrawals and cash expenses for a specific user in a given currency. The resulting amount has either a positive value, which means that he has an amount of company funds available in cash. If the wallet has a negative value, the employee has paid for company expenses with private money, so the company owes him money.

  • The status of the user’s cash wallet. If the user has multiple currencies, the app will display multiple wallets. Each then shows the amount of cash the user has on them in that currency.
  • In the case of ATM withdrawals using a Fidoo card, this entry is made in the relevant cash wallet.
  1. If you have made a withdrawal with your Fidoo card, you will see it in the app under My/Corporate FinanceCardsTransactions.
  2. In this interface, you can use the Set Filter button to view ATM withdrawals with any parameters.

Travel insurance

Travel Insurance FAQs

This is a standard travel insurance policy that is valid for both business and private travel.

Ask the main administrator in the app to arrange insurance for you.

The price depends on the insurance package you choose. Payment is subject to your company’s internal guidelines.

The travel insurance starts the day after it is taken out in the Fidoo app.

  • Call our 24-hour helpline +420 291 291 291 for advice and assistance.
  • Provide as much documentation as possible describing what happened: a medical report, all medical bills and medications, photos or video footage
  • damaged items (not only yours, but also the person you may have caused the damage to), police record, contacts of witnesses, etc.
  • Report the loss or damage to the carrier.
  • Make an inventory of the items you have lost, including proof of purchase.
  • Take photos or video footage of the damaged items.
  • If your belongings are stolen, get a police report.
  • On your return, complete the Claim Form and send it with the other documents to the insurer by email, post or online form.

Travel insurance is taken out for a period of 1 year, you can cancel the automatic extension at any time. To cancel the extension, ask the main application administrator.

  1. Click on your name (top left) – My profileProducts tab
  2. Click on a specific document to download it.

Creating an Assignment – Message

  1. My Finances – Cheques – Add cheque (top centre) – Message. In the left part of the screen a map will appear, in the right part fill in everything you need as follows:
  2. Trip information – enter the name of the trip and the person who was on the trip. You can choose someone other than yourself and fill in the report for her/him. The message will appear in the receipts for both you and the person named in the message.
    Information about the trip
  3. Route – describe the entire route, i.e. where you went from and to and what means of transport you chose.
    – Click on Add button (on the left between the waypoints) or on Add another waypoint (in the middle under the Route section) to add more route segments.
    – Click on :Koš_ikona: 
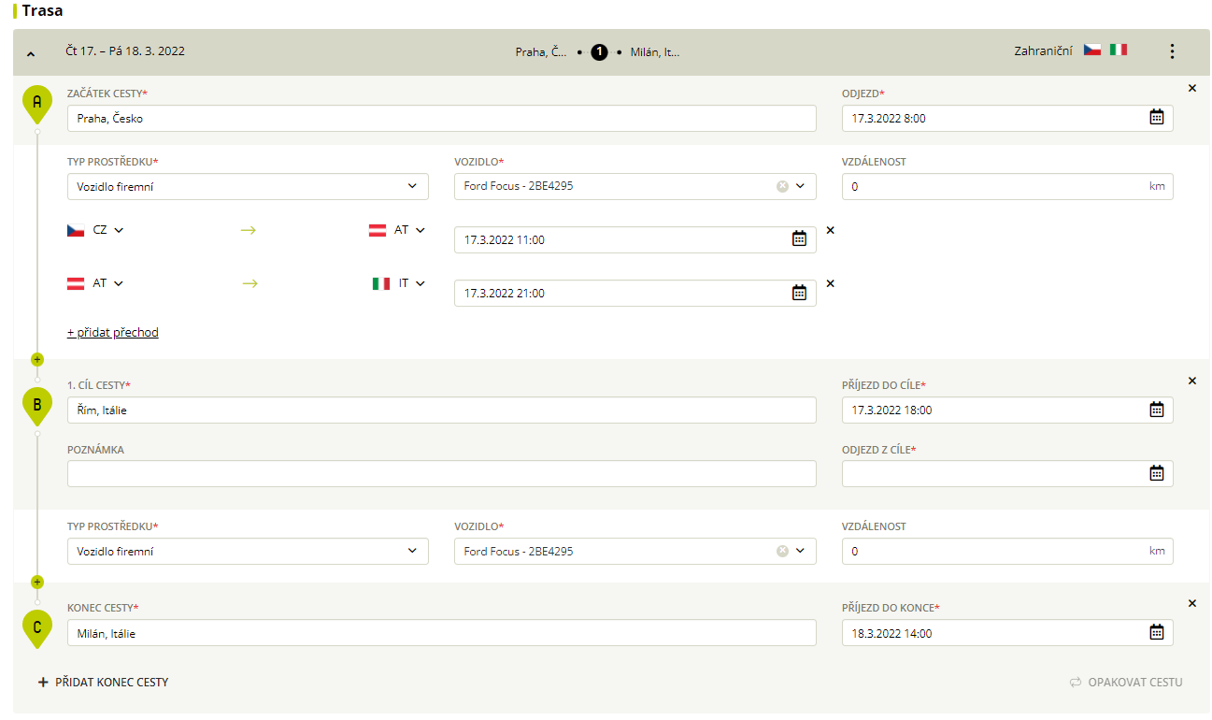
(right) to delete a section of the route.
    – When travelling abroad, you can click on +add a crossing to select the date and time of the border crossing.
  4. Additional information – fill in the cost centre and project, or select fellow travellers from the list of users.
    Additional information
  5. Meals – tick the days when you had meals provided.
    Meals on board
  6. Expenses – click on

    Add an existing expense


    , tick
    v
    list
    open
    In the list of open expenditures
    those relating to the business trip
    and select

    Add selected.

    If it is a cash expense and not yet created, click on

    Create new expense,

    enter the required fields, attach the receipt and


    Save

    . If you attach the wrong expense, you can delete it by clicking the cross to the right of the amount.

  7. Expense Overview – shows an overview of travel expenses, click on Show Expense Details below the overview to view the details.
  8. Save or Save and send the message for approval.

Creating a Report from an Application

  1. My Finances – ChequesApplications tab – select Application.
  2. Click the green Create Message button (top right).
  3. Edit as you see it, click Add Existed Expense in the Expenses section, tick the expenses in the list of open expenses that relate to the business trip and select Add Selected.
  4. Save or Save and send the message for approval.

Duplication Messages

  1. Section
    My Finances – Honours
    – bookmark
    News
    – click the Message you want to duplicate.
  2. Click (top right) and select
    Duplicate Message.
  3. Enter the date to which you wish to postpone the duplicated Report and select
    Move date
    .

Frequently asked questions about creating messages for assignment

You can only add co-travellers to an open Application or Report in the Additional Information section by selecting them from the list of users (there can be more than one). Once saved and sent for approval, the same Application/Message is created in their application for all travel companions and sent for approval. However, it is up to each individual to amend the Business Trip Report and add expenses.

  1. In the web app, select My/Team FinanceCheques.
  2. Click on the green Add Assignment button.
  3. Select whether you wish to enter a Request or Message.
  4. In the section Information about the trip fill in as Traveler the person you want to a receipt to create.
  1. Under My Finances – Treasury – Applications/Reports, click on Application/Report.
  2. Click and select Send copy to other passengers.
  3. Select a user and enter Send copy.
    .

The difference between an application and a report

It is an agenda combining the statements of work trip with the attached expenses and the calculation of meals, pocket money and any reimbursements for the trip. You can create, approve and bill receipts in the app. The whole process is done using two forms.

  1. You fill in the application form before your trip. You will describe the planned route and, if applicable, request an allowance.
  2. You fill in the mission report on the way. You can create it from the Business Travel Request.

Add a card to your Apple Wallet

  1. Launch the Apple Wallet app on your device (Apple Wallet) :apple_wallet:.
  2. In the Wallet app, click

    :plus_icon:

    .
  3. Tap Debit or credit card to add a Fidoo card.
  4. Click Continue.
  5. Follow the on-screen procedure to add a new card.
  6. If you have an Apple Watch paired, you’ll get the option to add the card to your watch at the same time.

For more detailed information on setting up Apple Pay, follow this link.

Displaying data about the digitisation of the Fidoo card

In the Fidoo web application, you can find information about the digitisation of the Fidoo card in the Cards section – Card Information tab in the details of the selected card:

Information about digitised cards is not available in the Fidoo mobile app. But you’ll find them in Apple Wallet on your device.

Conditions for digitising your Fidoo card

    • The physical Fidoo card must be:

      • personal (not team)

      • Active

    • The Fidoo card insertion device must:

      • support NFC

      • screen lock to be set on it – the phone unlocks after authentication (Face ID, Touch ID, PIN)

      • be iPhone with Face ID, iPhone models with Touch ID except iPhone 5S or iPad Pro, iPad Air, iPad and iPad mini with Touch ID or Face ID, or Apple Watch Series 1 and later

      • have iOS 14 and above to insert the card directly from the Fidoo mobile app

      • contain max. 10 digitised cards

Frequently asked questions

The Team Card cannot be used with Apple Pay. Only the personal Fidoo card can be digitised.

Yes, you can conveniently pay with your Fidoo card through this watch.

Add a personal card to Google Wallet

  1. Launch the Google Wallet app on your device (Google Wallet) .
  2. Click Add to Wallet at the bottom.
  3. Click on Payment Card (you will see all the cards stored under your Google account).
  4. Click on New credit or debit card (you can add a card using the camera or enter the card details manually).
  5. Confirm your choice by clicking Save at the bottom.
  6. After reading the publisher’s terms and conditions, select Accept.
  7. If you are asked to verify your payment method, select your preferred authentication option from the list.
  8. You will then receive a message and email notification that your card has been added and you can make contactless payments in stores, online and in apps where Google Pay is supported

Displaying data about the digitisation of the Fidoo card

In the Fidoo web application, you can find information about the digitisation of the Fidoo card in the Cards section – Card Information tab in the details of the selected card:

Information about digitised cards is not available in the Fidoo mobile app. But you’ll find them in the Google Pay mobile wallet on your device.

Conditions for digitising your Fidoo card

The physical Fidoo card must be:

    • personal (not team)
    • Active

The Fidoo card insertion device must:

    • support NFC
    • have a screen lock set on it – the phone will unlock after authentication (fingerprint, gesture, PIN, etc.)
    • Android 7 and above
    • contain less than 20 digitised cards

Frequently asked questions

The Team Card cannot be inserted into Google Pay. Only the personal Fidoo card can be digitised.

Yes, Google Pay is also available for Fitbit wristbands. So you can conveniently pay with your Fidoo card via this bracelet.

Correction of expenditure

An issue that you have submitted for approval may be rejected. In this case, you will receive an email with a rejection message and the reason. The issue will reappear in the application as an open issue with a returned Reimbursed expense. The repair process is the same as the modification process.

Web app

  1. My Finances – Expenses – click on the expense and select Edit.
  2. Fill in the necessary information and select Save and submit for approval.

Mobile app

  1. Bottom menu – Expenses – click on the expense and select Edit Expense.
  2. Fill in the necessary data and confirm with the check mark (top right).
  3. Enter Submit for approval.

FAQs on correcting expenses

You can edit an issue when it is in the Open status – i.e. not sent to a supervisor or accountant for approval. If the expense shows as Approved, contact the person in your company with the Accounting role who can reject the expense. This will return its status to Open and you will be able to edit the expense, or in the case of a cash expense you have the option to delete the expense.

Creating a Bulk Assignment

Repeat of a one-day business trip

  1. My Finance – Treasury section.
  2. Create a Request or Report, or select an existing one, click Settings icon and enter Edit Request/Report.
  3. In the Application/Report detail, click on Settings icon under Route and select Repeat Route
    or enter directly under the route listed.
  4. In the calendar, enter the days when the trip is repeated and confirm with the Repeat button.
  5. Save the Bulk Request/Message or Save and Submit for approval.

Adding a trip to a bulk transfer

  1. My Finances – Honours – select the open Application/Message you want to add a journey to.
  2. Click on Settings icon and select Edit Request/Report.
  3. In the Application/Report detail, click on Settings icon under Route (Paths) and select Add Path Before/Add Path After.
  4. Complete the path and Save or Save and Submit the bulk Request/Message for approval.

Interruption of a business trip

  1. My section
    Finance – Treasury
  2. Create the first leg of the journey by entering the departure date and location (point A) and the date and place of arrival (point B).
  3. For the last part of the route (point C) click on to delete the end of the route (it is possible to have multiple waypoints before breaking the route).
  4. Choose
    Add another trip
    and continue where you left off on the previous trip, select the date and time to restart the trip and continue filling in until the arrival date and location.
  5. Bulk Request/Message
    Save
    or
    Save and send for approval
    .

Deleting a path from a bulk transfer

  1. My Finances – Honours – select the Application/Message from which you want to remove the path.
  2. Click on Settings icon under Route and select Edit Request/Report.
  3. In the Requests/Messages detail, click on Settings icon next to the route you want to delete and select Delete Route or Expand the route you want to delete and select Delete Route directly below the route.

Frequently asked questions about creating messages for assignment

How do I enter multiple days at once on a repeat trip?

The calendar also allows you to select or deselect:

  • all Mondays / Tuesdays / Wednesdays… by clicking on the name of the day of the week (1),
  • the whole week by clicking on the week number (2),
  • select a specific day by clicking on a specific date (3),
  • all days of the month (4).

Example: selection of all working days in a month

  1. Click on “Select all days of the month”, this will select the whole month.
  2. Click on the name of the days of the week “Sat” and “Sun” to deselect Saturdays and Sundays.
  3. You can then deselect any other day of the month by clicking on that day.


Example: selecting every Tuesday of the month

  1. Click on the name of the day of the week “Tue”, this will mark all Tuesdays of the week.


Example: selection of all working days in 12. of the week

  1. Click on the week number 12 to mark all days of the week.
  2. Click on day 20 and 21 to deselect weekend days.

The calendar also allows you to select or deselect:

  • all Mondays / Tuesdays / Wednesdays… by clicking on the name of the day of the week (1),
  • the whole week by clicking on the week number (2),
  • select a specific day by clicking on a specific date (3),
  • all days of the month (4).

Example: selection of all working days in a month

  1. Click on “Select all days of the month”, this will select the whole month.
  2. Click on the name of the days of the week “Sat” and “Sun” to deselect Saturdays and Sundays.
  3. You can then deselect any other day of the month by clicking on that day.


Example: selecting every Tuesday of the month

  1. Click on the name of the day of the week “Tue” to mark all Tuesdays of the week.


Example: selection of all working days in 12. of the week

  1. Click on the week number 12 to mark all days of the week.
  2. Click on day 20 and 21 to deselect weekend days.

View transactions

Filter and download card transactions

  1. My Finances – Cards – here you can see all the card transactions you have created.
    Transactions in Fidoo
  2. Click Set filter, set the filtering parameters, and then type Confirm filter.
    Filtering transactions
  3. Click on Download icon to download a filtered transaction report.

View transactions on the card

Play Video

Transaction statuses

Blocked Transaction – the payment has been made but not yet accepted by the merchant, the blockage may last for several days.

Rejected transaction – the payment was not made for some reason (insufficient funds, wrong PIN, expired card, etc.)

Transaction FAQs

  • Check the validity of your card.
  • Make sure you enter the correct details (PIN, card number, expiry date, CVC/CVV code).
  • Make sure you have enough funds on your card.
  • Check that you are allowed the payment method you are trying to pay with.
  • If you have checked all of the above, please contact the customer service line.
  1. My Finance – Cards – Statements – here you can find all monthly statements for your card.
  2. Click on the listing and the details will be displayed on the right side of the screen.
  3. You can download the extract using the Download to pdf button .
  4. In the case of external cards, you can find the statement directly on the bank’s website.

Payment by card

Paying at the merchant's terminal

  • When paying up to CZK 500, just attach the card to the terminal.
  • For payments of more than CZK 500, hold your card to the terminal and enter your PIN.

Paying on the internet

Web app

  1. After selecting the payment method, you will be redirected to the payment gateway.
  2. Enter the full card number, expiry date, CVV/CVC code and confirm.


    Fidoo card

  3. Log in to Fidoo, where a payment confirmation window will appear.
  4. Click on Approve Payment.
  5. Enter the password to log in to the app and the SMS code that will be sent to your phone and Confirm.
  6. Close the payment confirmation window and return to the merchant’s website.


    External card
    The third step is to confirm the payment on your bank’s website according to their instructions.

Mobile app

  1. After selecting a payment method, you will be redirected to the payment gateway.
  2. Enter the full card number, expiry date, CVV/CVC code and confirm.
  3. Click on the notification you received on your phone.
  4. Click on Approve Payment.
  5. Confirm with a fingerprint, facial scan or PIN to log in to the app.
  6. Close the payment confirmation window and return to the merchant’s website.

ATM withdrawal

  1. Insert your card into the ATM and enter your PIN.
  2. Select Cash Withdrawal, enter or select the amount, confirm and proceed as instructed at the ATM.

MO/TO payments

What are MO/TO payments and what are they used for?

MO-TO payments is the term for transactions that take place “remotely” (i.e. over the phone or email).
They are used, for example. when booking a hotel, renting a car or ordering goods or services over the phone.
In practice, the payment is made by the cardholder providing sensitive card details to the other person without further
security (card number, expiry date and CVC/CVV code) and this payment can then be successfully
implemented.

Currently, MO/TO transactions are already minimally used, as they have been replaced by payment gateways. If
the cardholder encounters this type of transaction, we recommend caution and verification
the trader to whom the data is transmitted.


MO/TO transactions and Fidoo cards

Fidoo cards also support MO/TO transactions while maintaining an appropriate level of security. Already at the moment
activation of the Fidoo card, this payment method is automatically enabled.
However, the way in which the MO/TO enters the payment is often crucial to the success of the payment
processing directly by the merchant where the cardholder makes the payment. To eliminate potential problems
we recommend using payment terminals or payment gateways.

Frequently asked questions about paying by card

This is the three numbers listed on the back of the card by the signature strip. It is a code that is used to identify the card when paying online.

Confirmation via push notification is only available in the current version of the Fidoo mobile app for both iOS and Android. We recommend downloading the latest version.

The second reason may be that the merchant (the e-shop) does not require this method of verification.

With the Fidoo card, you can only top up Google Ads by topping up a specific amount in one go, as follows:

  1. In Google Ads, click on Settings & BillingBillingOverview at the top right.
  2. Click on the Make Payment button.
  3. In the window that opens, click Add Credit or Debit Card.
  4. Enter your Fidoo card details and the amount you want to top up.

    After checking your details and confirming, the top-up amount is immediately loaded into your Google account and the transaction is immediately displayed in the Fidoo app.

If you pay by card frequently or for smaller amounts, the merchant’s terminal may not connect to the bank to verify the current balance and charge the payment later. Why is this happening? Every online payment costs something, so some merchants accept small amounts. offline. It also helps them check in faster at the checkout. Thus, the card is not blocked, as is usual, and the merchant simply deducts the payment from the card in a few days, which can put the card in the negative.

It’s good to know that you won’t see the payment in the app if it’s offline. You will only see the payment when the merchant posts it.