Search
Close this search box.

Modify and send the expenditure for approval

Web app

  1. My Finances – Expenses – click on the expense and select Edit.
  2. Fill in the necessary details and select Save or Save and submit for approval.

Mobile app

Play Video

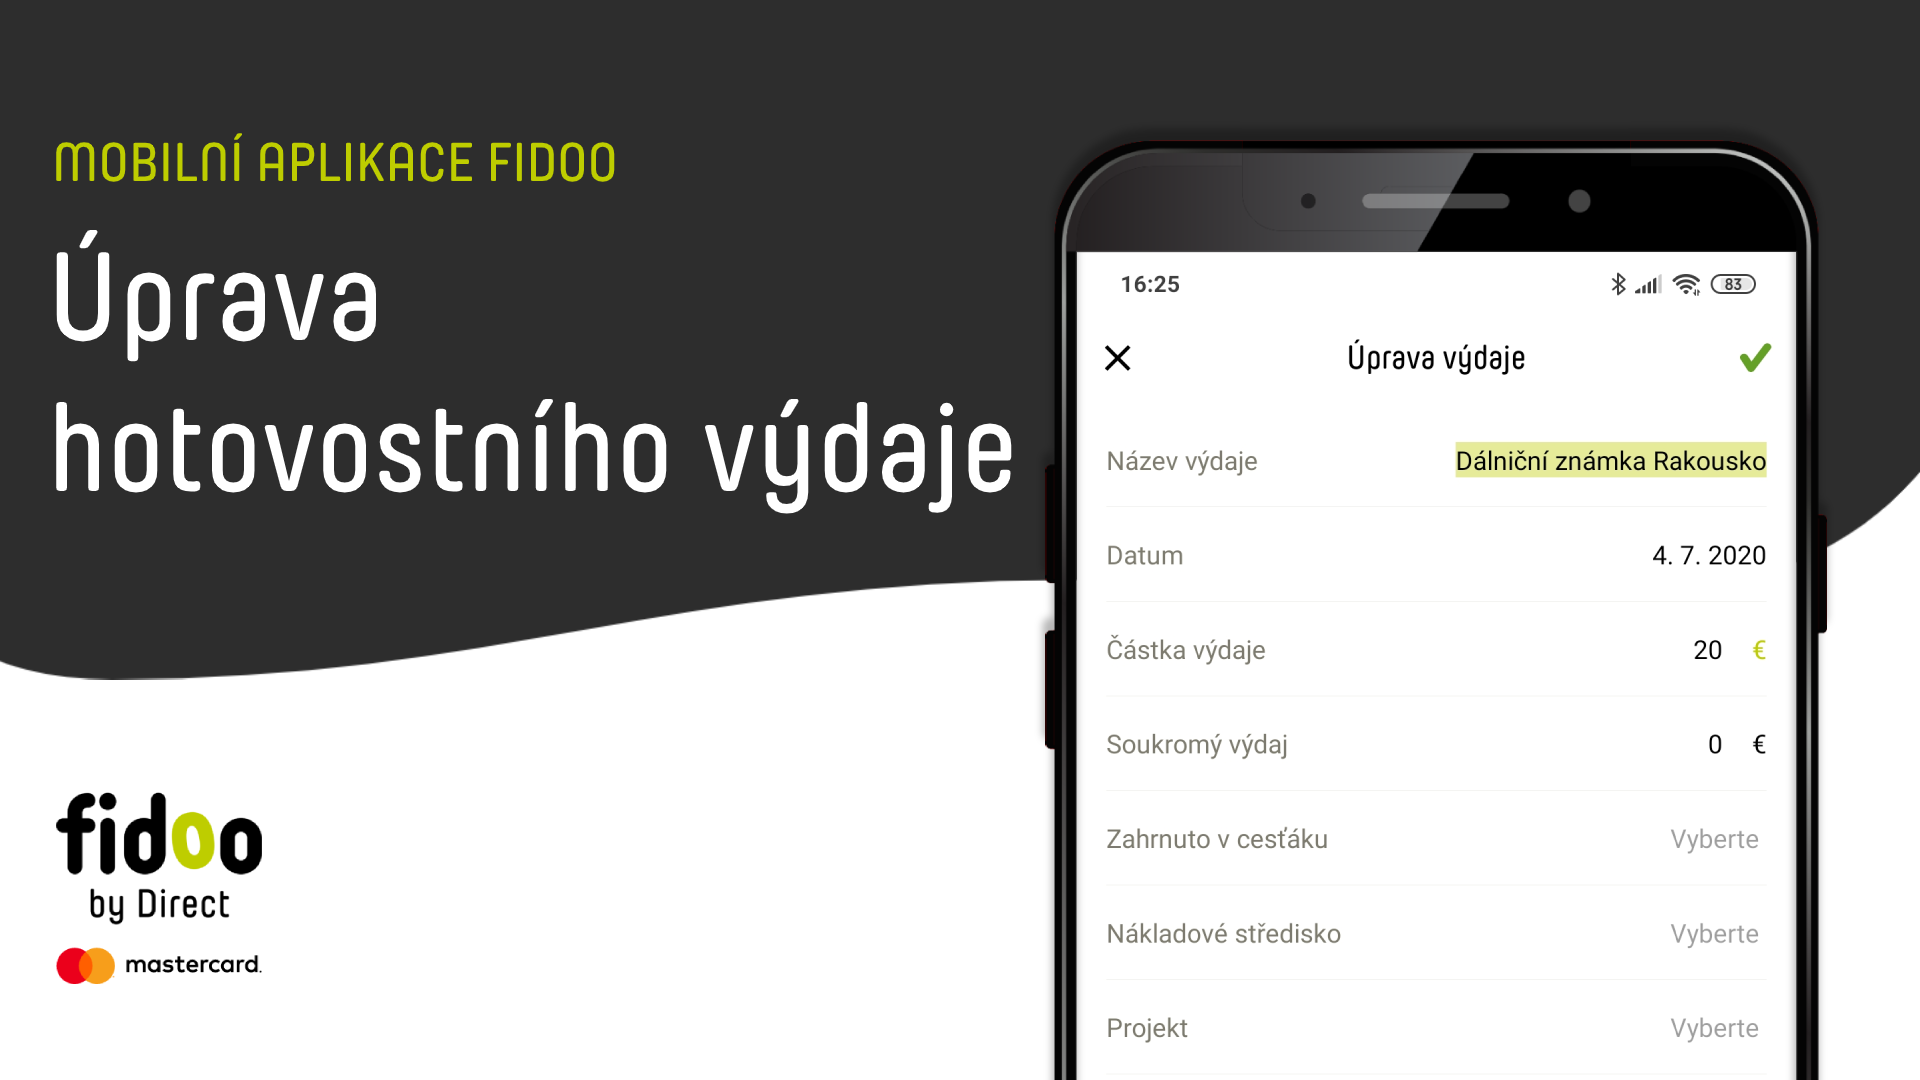
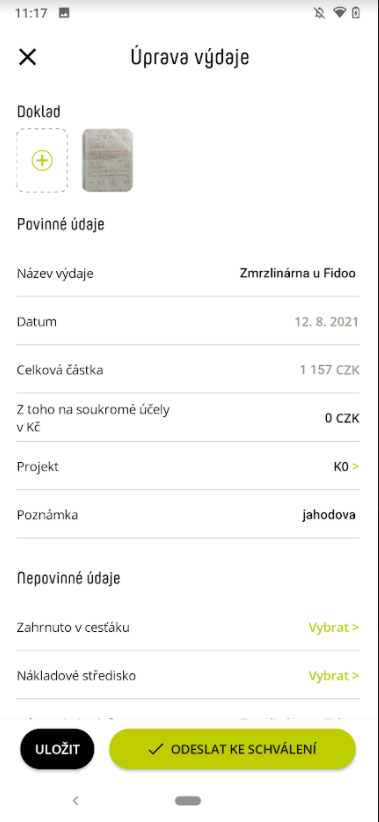
  1. Log in to the app
     or select Expenses in the bottom menu.
  2. Click on the expense and select Edit.


  3. Complete mandatory data and select Submit for approval.

Bulk send expenses for approval

Play Video

Required fields

The permanently set mandatory fields are:

  • Name of expenditure
  • Date of expenditure
  • Amount

Without this information, you will not generate an expense.

The optional mandatory fields are:

  • Cargo centre
  • Note
  • Project
  • Receipt

Do not send an expense for approval without this information.

Frequently asked questions about the web or mobile application

  • The basic mandatory fields will be filled in by card payment. If you are creating a cash expense, the application will not allow you to create an expense without entering this information.
  • The optional mandatory fields are set by the company and the company informs you of their settings. If you do not complete this field, the application will notify you when you submit the expense for approval and will not send the expense.

Cost centres can be added to an expense by the expense owner (the one who created the expense) or by the Accountant in the expense edit.

  1. In My/Corporate Finance, select any expense.
  2. On the right side of the screen you will see the detail of the expense along with a button with three dots.
  3. Clicking on this button will take you to the details of the expenditure.
  4. You can add a cost centre to an expense in the Advanced Information section.

You can add as many cost centres as you like to a single expenditure. However, you can always choose only from those that have already been set up for your company by the Accountant.

You can edit an issue when it is in the Open status – i.e. not sent to a supervisor or accountant for approval. If the expense shows as Approved, contact the person in your company with the Accounting role who can reject the expense. This will return its status to Open and you will be able to edit the expense, or in the case of a cash expense you have the option to delete the expense.

Photographing and attaching receipts/invoices

Web app

  1. My Finances – Expenses – click on the expense to which you want to attach a receipt and select Edit.
  2. Click on and insert the receipt from your computer.
  3. Save or Submit for approval (bottom right).

Mobile app

  1. Log in to the app via the notification you just received or the standard way.
  2. Find the expense you want to attach the receipt to
    and click on it
    . (If you clicked on the notification, you skip this step.)
  3. Choose Add receipt button Add document, insert or take a picture of the receipt and Confirm by entering.


  4. Go back to the list of expenses (top left arrow) or continue and select 
    Edit or directly Submit for approval.

  5. Fill in the mandatory data, Save or Send for approval.

How do I know if the receipt/invoice is well photographed?

  • It must be complete and contain all the data, just as in paper form.
  • It needs to be easy to read.
  • It shouldn’t be taken from an angle.
  • It must have the correct crop so that you cannot see the background against which you have photographed the receipt.
  • Take the photo in good lighting conditions.
  • There can only be one receipt/invoice per photo.
  • Photograph a multi-page document so that only one page is on each photo.
  • Photograph longer documents in multiple parts to maintain legibility.

Frequently asked questions about taking photos and attaching receipts

  • Make sure the photo of the receipt is not too large.
  • Make sure you have a sufficient network connection, or take a picture of your receipt and try again later.
  • It means that you took a picture of the receipt from a higher angle and the app straightened it. To avoid this, take pictures of receipts from above.

Cash expenditure

Creating an expense

The cash expenditure must be created manually.

Web app

  1. My Finances – Expenses – Add Expense (top centre).
  2. Complete required details Save or Save and submit for approval.

Mobile app

  1. Once you have logged in, you are directly in Issues – click on Add button (bottom right).
  2. Take a picture of the receipt, edit and confirm with a pipe.
  3. Fill in the required information and Submit for approval

Deleting an expense

Web app

  1. My Finances – Expenses – click on the expense you want to delete.
  2. Click on , select Delete Expense and confirm with the Delete button .

Mobile app

  1. After logging in, you are directly in Expenses – click on the expense you want to delete.
  2. On the top right, select Delete Expense over the three dots and confirm with the Delete button.

Frequently asked questions about cash expenses

  • My Finances – Cash – Here you can find all your cash expenses and ATM withdrawals.
  • You can filter expenses using the Set filter button and download using the Download icon button.

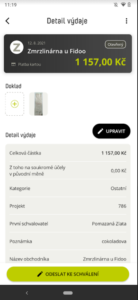
In the cash wallet, you can see the current total amount including ATM withdrawals and cash expenses for a specific user in a given currency. The resulting amount has either a positive value, which means that he has an amount of company funds available in cash. If the wallet has a negative value, the employee has paid for company expenses with private money, so the company owes him money.

  • The status of the user’s cash wallet. If the user has multiple currencies, the app will display multiple wallets. Each then shows the amount of cash the user has on them in that currency.
  • In the case of ATM withdrawals using a Fidoo card, this entry is made in the relevant cash wallet.
  1. If you have made a withdrawal with your Fidoo card, you will see it in the app under My/Corporate FinanceCardsTransactions.
  2. In this interface, you can use the Set Filter button to view ATM withdrawals with any parameters.

Correction of expenditure

An issue that you have submitted for approval may be rejected. In this case, you will receive an email with a rejection message and the reason. The issue will reappear in the application as an open issue with a returned Reimbursed expense. The repair process is the same as the modification process.

Web app

  1. My Finances – Expenses – click on the expense and select Edit.
  2. Fill in the necessary information and select Save and submit for approval.

Mobile app

  1. Bottom menu – Expenses – click on the expense and select Edit Expense.
  2. Fill in the necessary data and confirm with the check mark (top right).
  3. Enter Submit for approval.

FAQs on correcting expenses

You can edit an issue when it is in the Open status – i.e. not sent to a supervisor or accountant for approval. If the expense shows as Approved, contact the person in your company with the Accounting role who can reject the expense. This will return its status to Open and you will be able to edit the expense, or in the case of a cash expense you have the option to delete the expense.