Search
Close this search box.

Travel insurance

Travel Insurance FAQs

This is a standard travel insurance policy that is valid for both business and private travel.

Ask the main administrator in the app to arrange insurance for you.

The price depends on the insurance package you choose. Payment is subject to your company’s internal guidelines.

The travel insurance starts the day after it is taken out in the Fidoo app.

  • Call our 24-hour helpline +420 291 291 291 for advice and assistance.
  • Provide as much documentation as possible describing what happened: a medical report, all medical bills and medications, photos or video footage
  • damaged items (not only yours, but also the person you may have caused the damage to), police record, contacts of witnesses, etc.
  • Report the loss or damage to the carrier.
  • Make an inventory of the items you have lost, including proof of purchase.
  • Take photos or video footage of the damaged items.
  • If your belongings are stolen, get a police report.
  • On your return, complete the Claim Form and send it with the other documents to the insurer by email, post or online form.

Travel insurance is taken out for a period of 1 year, you can cancel the automatic extension at any time. To cancel the extension, ask the main application administrator.

  1. Click on your name (top left) – My profileProducts tab
  2. Click on a specific document to download it.

Creating an Assignment – Message

  1. My Finances – Cheques – Add cheque (top centre) – Message. In the left part of the screen a map will appear, in the right part fill in everything you need as follows:
  2. Trip information – enter the name of the trip and the person who was on the trip. You can choose someone other than yourself and fill in the report for her/him. The message will appear in the receipts for both you and the person named in the message.
    Information about the trip
  3. Route – describe the entire route, i.e. where you went from and to and what means of transport you chose.
    – Click on Add button (on the left between the waypoints) or on Add another waypoint (in the middle under the Route section) to add more route segments.
    – Click on :Koš_ikona: 
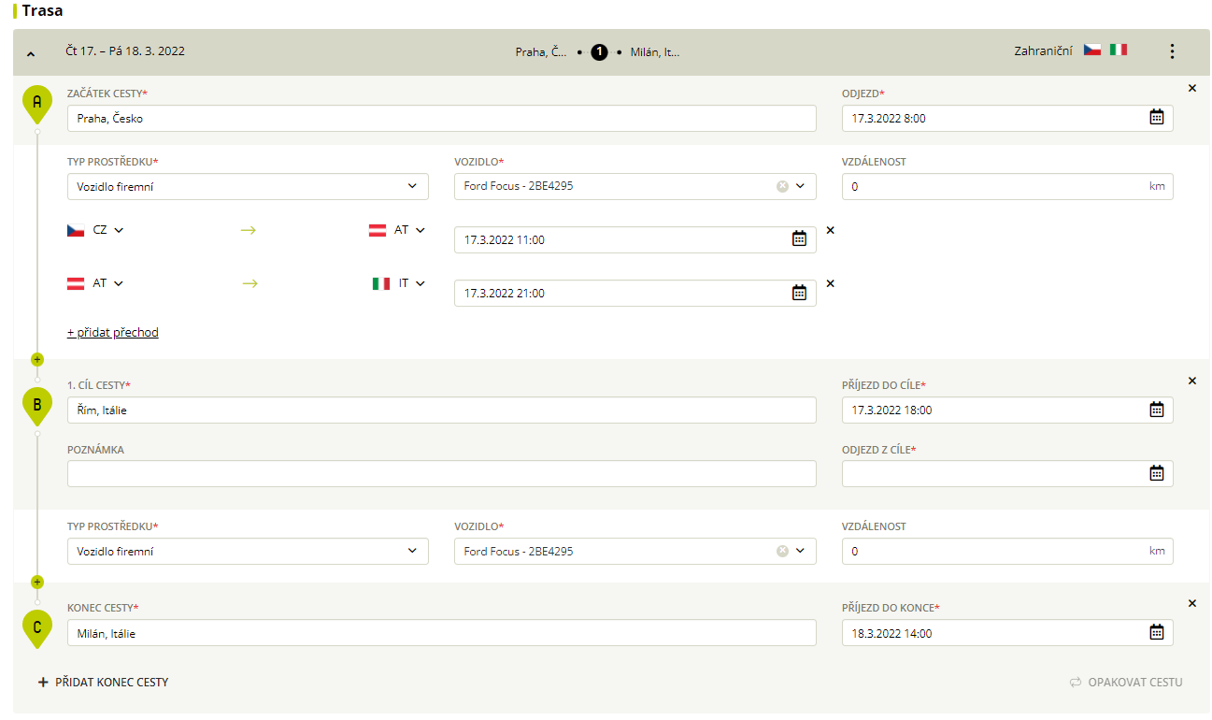
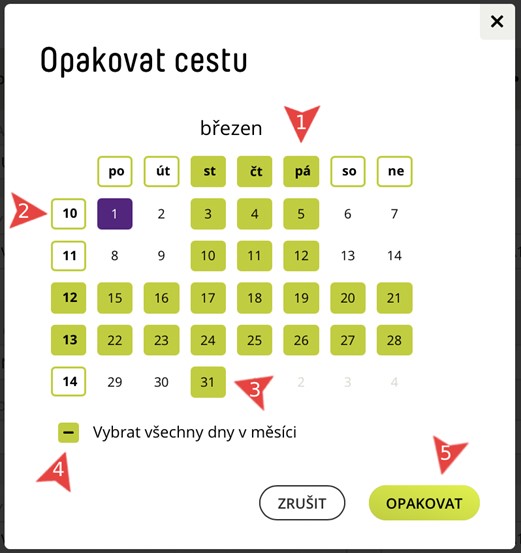
(right) to delete a section of the route.
    – When travelling abroad, you can click on +add a crossing to select the date and time of the border crossing.
  4. Additional information – fill in the cost centre and project, or select fellow travellers from the list of users.
    Additional information
  5. Meals – tick the days when you had meals provided.
    Meals on board
  6. Expenses – click on

    Add an existing expense


    , tick
    v
    list
    open
    In the list of open expenditures
    those relating to the business trip
    and select

    Add selected.

    If it is a cash expense and not yet created, click on

    Create new expense,

    enter the required fields, attach the receipt and


    Save

    . If you attach the wrong expense, you can delete it by clicking the cross to the right of the amount.

  7. Expense Overview – shows an overview of travel expenses, click on Show Expense Details below the overview to view the details.
  8. Save or Save and send the message for approval.

Creating a Report from an Application

  1. My Finances – ChequesApplications tab – select Application.
  2. Click the green Create Message button (top right).
  3. Edit as you see it, click Add Existed Expense in the Expenses section, tick the expenses in the list of open expenses that relate to the business trip and select Add Selected.
  4. Save or Save and send the message for approval.

Duplication Messages

  1. Section
    My Finances – Honours
    – bookmark
    News
    – click the Message you want to duplicate.
  2. Click (top right) and select
    Duplicate Message.
  3. Enter the date to which you wish to postpone the duplicated Report and select
    Move date
    .

Frequently asked questions about creating messages for assignment

You can only add co-travellers to an open Application or Report in the Additional Information section by selecting them from the list of users (there can be more than one). Once saved and sent for approval, the same Application/Message is created in their application for all travel companions and sent for approval. However, it is up to each individual to amend the Business Trip Report and add expenses.

  1. In the web app, select My/Team FinanceCheques.
  2. Click on the green Add Assignment button.
  3. Select whether you wish to enter a Request or Message.
  4. In the section Information about the trip fill in as Traveler the person you want to a receipt to create.
  1. Under My Finances – Treasury – Applications/Reports, click on Application/Report.
  2. Click and select Send copy to other passengers.
  3. Select a user and enter Send copy.
    .

The difference between an application and a report

It is an agenda combining the statements of work trip with the attached expenses and the calculation of meals, pocket money and any reimbursements for the trip. You can create, approve and bill receipts in the app. The whole process is done using two forms.

  1. You fill in the application form before your trip. You will describe the planned route and, if applicable, request an allowance.
  2. You fill in the mission report on the way. You can create it from the Business Travel Request.

Creating a Bulk Assignment

Repeat of a one-day business trip

  1. My Finance – Treasury section.
  2. Create a Request or Report, or select an existing one, click Settings icon and enter Edit Request/Report.
  3. In the Application/Report detail, click on Settings icon under Route and select Repeat Route
    or enter directly under the route listed.
  4. In the calendar, enter the days when the trip is repeated and confirm with the Repeat button.
  5. Save the Bulk Request/Message or Save and Submit for approval.

Adding a trip to a bulk transfer

  1. My Finances – Honours – select the open Application/Message you want to add a journey to.
  2. Click on Settings icon and select Edit Request/Report.
  3. In the Application/Report detail, click on Settings icon under Route (Paths) and select Add Path Before/Add Path After.
  4. Complete the path and Save or Save and Submit the bulk Request/Message for approval.

Interruption of a business trip

  1. My section
    Finance – Treasury
  2. Create the first leg of the journey by entering the departure date and location (point A) and the date and place of arrival (point B).
  3. For the last part of the route (point C) click on to delete the end of the route (it is possible to have multiple waypoints before breaking the route).
  4. Choose
    Add another trip
    and continue where you left off on the previous trip, select the date and time to restart the trip and continue filling in until the arrival date and location.
  5. Bulk Request/Message
    Save
    or
    Save and send for approval
    .

Deleting a path from a bulk transfer

  1. My Finances – Honours – select the Application/Message from which you want to remove the path.
  2. Click on Settings icon under Route and select Edit Request/Report.
  3. In the Requests/Messages detail, click on Settings icon next to the route you want to delete and select Delete Route or Expand the route you want to delete and select Delete Route directly below the route.

Frequently asked questions about creating messages for assignment

How do I enter multiple days at once on a repeat trip?

The calendar also allows you to select or deselect:

  • all Mondays / Tuesdays / Wednesdays… by clicking on the name of the day of the week (1),
  • the whole week by clicking on the week number (2),
  • select a specific day by clicking on a specific date (3),
  • all days of the month (4).

Example: selection of all working days in a month

  1. Click on “Select all days of the month”, this will select the whole month.
  2. Click on the name of the days of the week “Sat” and “Sun” to deselect Saturdays and Sundays.
  3. You can then deselect any other day of the month by clicking on that day.


Example: selecting every Tuesday of the month

  1. Click on the name of the day of the week “Tue”, this will mark all Tuesdays of the week.


Example: selection of all working days in 12. of the week

  1. Click on the week number 12 to mark all days of the week.
  2. Click on day 20 and 21 to deselect weekend days.

The calendar also allows you to select or deselect:

  • all Mondays / Tuesdays / Wednesdays… by clicking on the name of the day of the week (1),
  • the whole week by clicking on the week number (2),
  • select a specific day by clicking on a specific date (3),
  • all days of the month (4).

Example: selection of all working days in a month

  1. Click on “Select all days of the month”, this will select the whole month.
  2. Click on the name of the days of the week “Sat” and “Sun” to deselect Saturdays and Sundays.
  3. You can then deselect any other day of the month by clicking on that day.


Example: selecting every Tuesday of the month

  1. Click on the name of the day of the week “Tue” to mark all Tuesdays of the week.


Example: selection of all working days in 12. of the week

  1. Click on the week number 12 to mark all days of the week.
  2. Click on day 20 and 21 to deselect weekend days.

Travel guide

When you open the logbook, the current month and vehicle list will be displayed. To switch to another month, click on the arrows placed next to the name of the month.

Filling in the logbook

When filling in the logbook, the application saves continuously, so there is no need to click the Save button, which is not found in this section.

  1. My Finance Logbook – click on the vehicle whose logbook you want to fill in.
  2. Before you start filling in individual journeys for the first time, fill in the initial odometer reading at the beginning of the month. By filling in the runs one by one, you will be able to calculate the ending balance. If you also fill in the final status, the app will show you the number of kilometres you need to enter for the month.

  3. On the desired day, select the type of journey and fill in the mandatory fields for the journey: from where, to where, length in km, starting and ending odometer reading, journey time, break and purpose (in the case of a private journey, the last 2 fields do not need to be filled in).
  4. After filling in all the days in the month when the car was used, select Sign and Sign again.

Entering a reverse journey

  1. My Finance Logbook – click on the vehicle whose logbook you will be filling in.
  2. Click on a ride to view its details – select Ride back.
  3. All mandatory fields are automatically filled in, the departure time is delayed by 1 hour after the arrival time.

Repeating the ride

  1. My Finance Logbook – click on the vehicle whose logbook you will be filling in.
  2. Click on a ride to view its details – select Repeat Ride.
  3. In the calendar that appears, select the days when the trip was repeated and enter Repeat.

Deleting a ride

  1. My Finance Logbook – click on the vehicle whose logbook you will be filling in.
  2. Click on a ride to view its details – select Delete.

Frequently asked questions about the Journey Book

In the BETA version it is possible to sign the logbook without all the necessary data required by law. Only distance or speedometer information is required. When signing the logbook, you will get a message that the logbook cannot be signed for some reason or that some journeys are not complete according to the government regulation. You can verify this information by clicking on the bulb which will be displayed next to the route of the incomplete journey, but even if you don’t correct the errors, you can sign the logbook.