Search
Close this search box.

Expenditure

Creating a VAT breakdown

  1. Section Settings – Expenses – VAT breakdown.
  2. Click on New VAT breakdown, add the name and abbreviation and Save.

Adjustment of VAT breakdown

  1. Section Settings Expenses VAT breakdown.
  2. Click on and turn off/on the use of segmentation.
  3. Click on Edit button, edit the name or abbreviation and Save.

Deleting the VAT breakdown

  1. Section Settings Expenses VAT breakdown.
  2. Click on and select Delete VAT breakdown.
  3. Confirm with the Delete VAT breakdown button.

Creating a preconfiguration

  1. Section Settings Expenses Pre-accounting.

    Manual settings

  2. Click on
    New preconfiguration.
  3. Fill in the name, code, usage and accounts and
    Save
    .

    Importing a list of preconfigurations

  4. Click on
    Import preconfigurations.
  5. Download and fill in the prepared sample file.
  6. Click on
    Insert file
    , find it on your computer and select
    Import
    .

Modifying pre-contraction

  1. Section Settings Expenses Pre-accounting.
  2. Click on Options switch and turn off/on the use of preconfiguration.
  3. Click on , edit and Save.

Deleting a preconfiguration

  1. Section Settings Expenses Prepayments.
  2. Click on and select Delete Preconfiguration.
  3. Confirm with the Delete preconfirmation button.

Creating a cost centre

  1. Settings Expenses Cost centres.

    Manual settings

  2. Click on New cost centre.
  3. Fill in the name and abbreviation and Save.

    Import list of resorts

  4. Click Import resorts.
  5. Download and fill in the prepared sample file.
  6. Click Insert File, find the file on your computer and select Import.

Cost centre modification

  1. Settings Expenses Cost centres.
  2. Click on Options switch and turn off/on the use of the cost centre.
  3. Click on , edit the name or abbreviation and Save.

Deleting a cost centre

  1. Settings Expenses Cost centres.
  2. Click on and select Delete.
  3. Confirm with the Delete Centre button.

Mandatory field settings

  1. Section Settings Expenses Required fields.
  2. Use the Options switch button to turn off/on the obligation to add a specific expenditure.

Managing and changing teams

Adding members to the team

  1. Settings Teams – select the team you want to edit.
  2. Click on Settings icon and select Add Team Members.
  3. Check the users you want to add and select Add Selected.

Adding users to your team

Change manager or team name

  1. Settings Teams – select the team you want to edit.
  2. Click on Settings icon and select Edit.
  3. Edit the name or select another manager from the list of users and Save Changes.

Change team settings

Deleting a team

  1. Settings Teams – select the team you want to delete.
  2. Click on Settings icon and select Delete Team.
  3. Confirm with the Delete team button.

Travel reports

Setting the meal allowance

The meal allowance rates listed in the application are set according to the Labour Code. However, you can adjust them higher as follows:

  1. Section SettingsCredits MealsCreate new (top right).
  2. Write the name and select the validity, add the new domestic meal allowance rates.

    You can adjust the foreign meal allowance:
    a) Bulk – enter the percentage of the meal allowance and select Recalculate.
    b) Individually – in the search window, type the country for which you want to adjust the meal allowance and change the rate for the selected country.

  3. Save.

Setting your pocket money for a trip abroad

  1. Settings Honours Pocket Money – activate Pocket Money in the system (top right).
  2. Choose to calculate your pocket money before or after the reduction of foreign diets.
  3. Enter the percentage of your pocket money and select Recalculate.
  4. Save.

Mandatory field settings

  1. Section
    Settings – Honourings – Required fields
  2. Use the button button to enable/disable the obligation to add a specific data to the expenditure.

Management and changes to assignments

Changes to meal allowance rates

The meal plan cannot be changed, only a new one can be created with the earliest date of validity from the day after its creation. This setting is valid until it is replaced by a new setting.

  1. Section Settings Credits- Meals Create new (top right).
  2. Write the name and select the validity, add the new domestic meal allowance rates.
    You can adjust the foreign meal allowance:
    a. Bulk – enter the percentage of the meal allowance and select Recalculate.
    b. Individually – in the search box, type the country for which you want to adjust the meal allowance. Also change the rate for the selected country.
    Meal allowance rates
  3. Save.

Changes to pocket money rates

  1. Section Settings Honours Pocket Money.
  2. Choose to calculate your pocket money before or after the reduction of foreign diets.
  3. Enter the percentage of your pocket money and select Recalculate.
  4. Save.

Teams

Team formation

  1. SettingsTeamsAdd Team (top middle) .
  2. Name the team, select its manager and click Add Team.
    Adding a new team in Fidoo
  3. Click on 
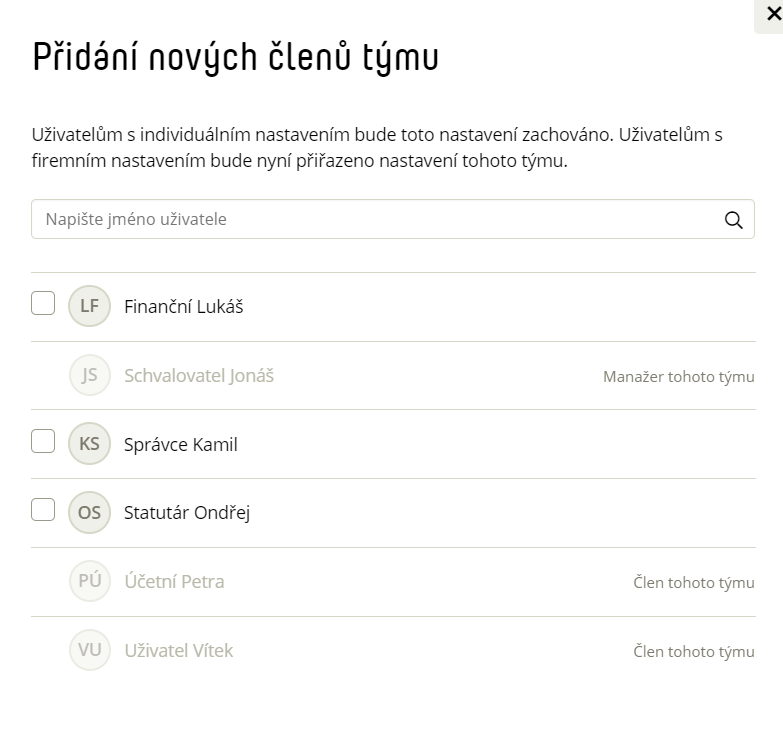
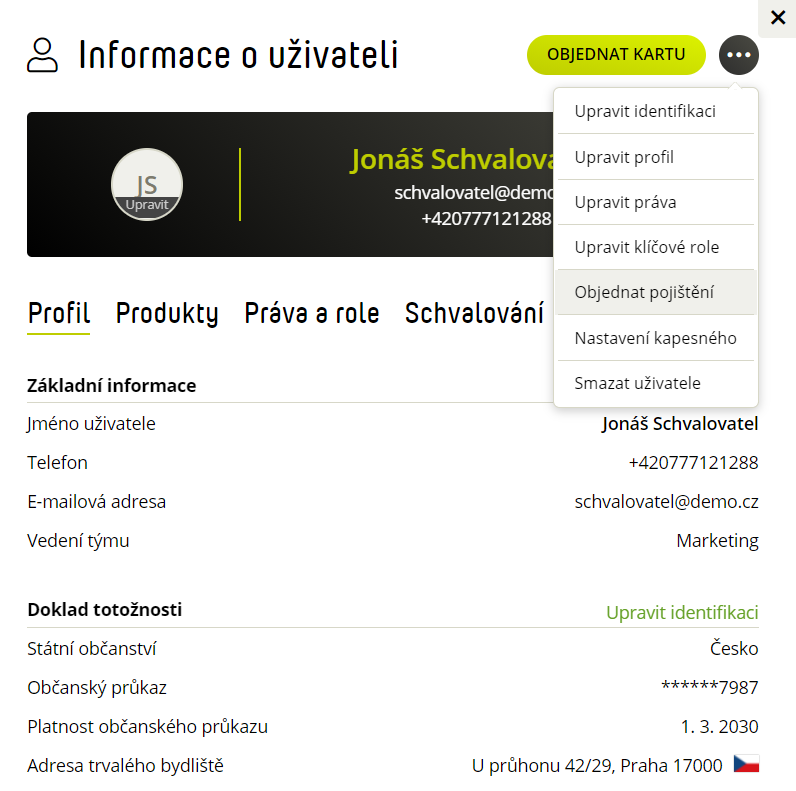
, select Add Team Members and select them from the list of users in the app.
  4. Confirm with the Add Selected button.

Team setup

SettingsTeams – click on the team you want to set up.

  1. Approval tab
    a. Select Individual Approval.

    b. Scroll and select each approver and Save Settings.
  2. Settings tab
    a. Select Individual settings for this team.
    b. Scroll to select cost centres and projects and Save.

Vehicle management

Vehicle activation/deactivation

  1. Section Settings Vehicles – click on the vehicle you want to activate/deactivate.
    The vehicle is active:
  2. Click on  and select Deactivate vehicle.
    The vehicle is deactivated:
  3. Click on and select Activate vehicle.

Vehicle modification

  1. SettingsVehicles – click on the vehicle you want to edit.
  2. Click on the green Edit sign (right side of the screen).
  3. Edit the required data and Save.

Deleting a vehicle

  1. Section Settings – Vehicles.
  2. Click on the vehicle you want to delete and via select Delete vehicle.
  3. Confirm with the button Delete.

Export of vehicles

  1. Section Settings – Vehicles .
  2. Set the filter and click on
  3. ChooseFormat and click on Export.

Projects

Creating a project

  1. Section SettingsProjects.
    Manual settings
  2. Click on Add Project (top middle) .
  3. Fill in the necessary fields and select Save Project.
    Import project list
  4. Click on Import projects.
  5. Download and fill in the prepared sample file.
  6. Click Insert File, find the file on your computer and select Import.

Project approval settings

  1. Section Settings – Projects – click on the project you want to set up.
  2. Select the Approvers tab (right side of the screen).
  3. Check Individual Settings and select Single or Dual Approval.
  4. Select the approver, the approval limit and Save settings.

Modification of the project

  1. Section
    Settings – Projects
  2. Click and select
    deactivate/edit project
    .
  3. After the modification still
    Save
    .

Deleting a project

  1. Section
    Settings – Projects.
  2. Click and select
    Delete project
    .
  3. Confirm with the button
    Delete project
    .

Project management and changes

Modification of the project

  1. Section Settings Projects – select the project you want to edit.
  2. Click on
    Settings icon
    and select Edit Project.
    Modification of the project
  3. Edit the necessary data and Save the project.

Project activation/deactivation

  1. Section Settings Projects – select the project you want to edit.
  2. Click on
    Settings icon
    and type Activate/deactivate project.

Deleting a project

  1. Settings Projects – click on the project you want to delete.
  2. Click on
    Settings icon
    and select Delete Project.

Managing changes in approval

Adjustment of approval at company level

  1. Section Settings Company Approval.
  2. Select the approval method, levels, and select an approver from the list of application users.
    Change of approval on the company
  3. Confirm with the Save settings button.
    If you want to set up consistent approvals for all users, teams, and projects at the company level, proceed as follows:
  4. Click Override all individual settings.
  5. Confirm with the Override all settings button.

Modifying team-level approvals

  1. Settings Teams – select the team you want to edit.
  2. Approval tab.
    Change of approval in the team
  3. Edit levels and approvers and Save settings.
    If a team member has individual user-level approvals set up, you need to override all of these settings to team-level approvals. After saving the settings, continue:
  4. Click the Override all individual settings box and confirm with the Override settings button.

Modification of project level approval

  1. Section Settings Projects – select the project you want to edit.
  2. Approvers tab.
    Change of approval on the project
  3. Edit levels and approvers and Save settings.

Approval Management FAQs

Setting approvers at the company level is used if you do not have an approver set on the project and/or if you have set “approvals are governed by company level settings” on the project.

Follow the instructions below to set up individual user approval.

  1. In Settings → People , click on the user for whom you want to set up approval.
  2. After selecting a user, the user detail with the Approvals tab appears on the right side of the screen.
  3. In this tab, you select the Individual Settings option and override it according to your requirements.
  4. Since the settings of the cards are based on the settings on the users, this change is immediately written into the personal card settings of the users.

Travel insurance

Ordering travel insurance

  1. Section Settings People – select the user for whom you want to arrange travel insurance.
  2. Click on
    Settings icon
    and select Order Insurance.
    Order insurance
  3. Select the type of insurance by clicking the Order Standard Insurance or Order Plus Insurance button.
  4. Confirm with the Order insurance button.

Cancellation of travel insurance

  1. Settings People – select the user you want to cancel travel insurance for.
  2. Click on
    Settings icon
    and select Terminate Insurance.
  3. Confirm with the Cancel Insurance button.

Download travel insurance documents

  1. Settings People Products tab.
  2. Click here to download the necessary documents.