Search
Close this search box.

Cash expenditure

Creating an expense

The cash expenditure must be created manually.

Web app

  1. My Finances – Expenses – Add Expense (top centre).
  2. Complete required details Save or Save and submit for approval.

Mobile app

  1. Once you have logged in, you are directly in Issues – click on Add button (bottom right).
  2. Take a picture of the receipt, edit and confirm with a pipe.
  3. Fill in the required information and Submit for approval

Deleting an expense

Web app

  1. My Finances – Expenses – click on the expense you want to delete.
  2. Click on , select Delete Expense and confirm with the Delete button .

Mobile app

  1. After logging in, you are directly in Expenses – click on the expense you want to delete.
  2. On the top right, select Delete Expense over the three dots and confirm with the Delete button.

Frequently asked questions about cash expenses

  • My Finances – Cash – Here you can find all your cash expenses and ATM withdrawals.
  • You can filter expenses using the Set filter button and download using the Download icon button.

In the cash wallet, you can see the current total amount including ATM withdrawals and cash expenses for a specific user in a given currency. The resulting amount has either a positive value, which means that he has an amount of company funds available in cash. If the wallet has a negative value, the employee has paid for company expenses with private money, so the company owes him money.

  • The status of the user’s cash wallet. If the user has multiple currencies, the app will display multiple wallets. Each then shows the amount of cash the user has on them in that currency.
  • In the case of ATM withdrawals using a Fidoo card, this entry is made in the relevant cash wallet.
  1. If you have made a withdrawal with your Fidoo card, you will see it in the app under My/Corporate FinanceCardsTransactions.
  2. In this interface, you can use the Set Filter button to view ATM withdrawals with any parameters.

Travel insurance

Travel Insurance FAQs

This is a standard travel insurance policy that is valid for both business and private travel.

Ask the main administrator in the app to arrange insurance for you.

The price depends on the insurance package you choose. Payment is subject to your company’s internal guidelines.

The travel insurance starts the day after it is taken out in the Fidoo app.

  • Call our 24-hour helpline +420 291 291 291 for advice and assistance.
  • Provide as much documentation as possible describing what happened: a medical report, all medical bills and medications, photos or video footage
  • damaged items (not only yours, but also the person you may have caused the damage to), police record, contacts of witnesses, etc.
  • Report the loss or damage to the carrier.
  • Make an inventory of the items you have lost, including proof of purchase.
  • Take photos or video footage of the damaged items.
  • If your belongings are stolen, get a police report.
  • On your return, complete the Claim Form and send it with the other documents to the insurer by email, post or online form.

Travel insurance is taken out for a period of 1 year, you can cancel the automatic extension at any time. To cancel the extension, ask the main application administrator.

  1. Click on your name (top left) – My profileProducts tab
  2. Click on a specific document to download it.

Creating an Assignment – Message

  1. My Finances – Cheques – Add cheque (top centre) – Message. In the left part of the screen a map will appear, in the right part fill in everything you need as follows:
  2. Trip information – enter the name of the trip and the person who was on the trip. You can choose someone other than yourself and fill in the report for her/him. The message will appear in the receipts for both you and the person named in the message.
    Information about the trip
  3. Route – describe the entire route, i.e. where you went from and to and what means of transport you chose.
    – Click on Add button (on the left between the waypoints) or on Add another waypoint (in the middle under the Route section) to add more route segments.
    – Click on :Koš_ikona: (right) to delete a section of the route.
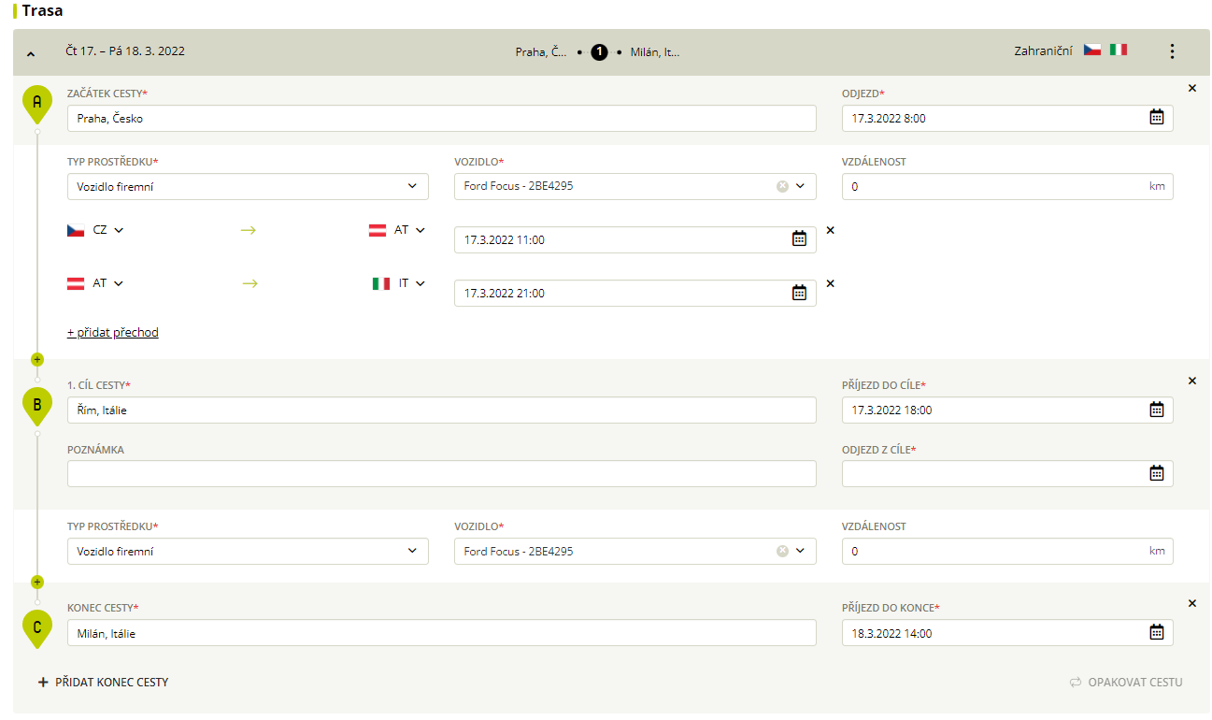
    – When travelling abroad, you can click on +add a crossing to select the date and time of the border crossing.
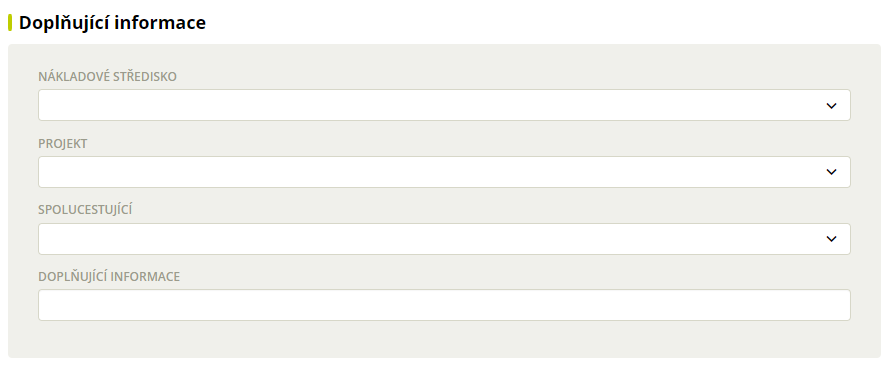
  4. Additional information – fill in the cost centre and project, or select fellow travellers from the list of users.
    Additional information
  5. Meals – tick the days when you had meals provided.
    Meals on board
  6. Expenses – click on

    Add an existing expense


    , tick
    v
    list
    open
    In the list of open expenditures
    those relating to the business trip
    and select

    Add selected.

    If it is a cash expense and not yet created, click on

    Create new expense,

    enter the required fields, attach the receipt and


    Save

    . If you attach the wrong expense, you can delete it by clicking the cross to the right of the amount.

  7. Expense Overview – shows an overview of travel expenses, click on Show Expense Details below the overview to view the details.
  8. Save or Save and send the message for approval.

Creating a Report from an Application

  1. My Finances – ChequesApplications tab – select Application.
  2. Click the green Create Message button (top right).
  3. Edit as you see it, click Add Existed Expense in the Expenses section, tick the expenses in the list of open expenses that relate to the business trip and select Add Selected.
  4. Save or Save and send the message for approval.

Duplication Messages

  1. Section
    My Finances – Honours
    – bookmark
    News
    – click the Message you want to duplicate.
  2. Click (top right) and select
    Duplicate Message.
  3. Enter the date to which you wish to postpone the duplicated Report and select
    Move date
    .

Frequently asked questions about creating messages for assignment

You can only add co-travellers to an open Application or Report in the Additional Information section by selecting them from the list of users (there can be more than one). Once saved and sent for approval, the same Application/Message is created in their application for all travel companions and sent for approval. However, it is up to each individual to amend the Business Trip Report and add expenses.

  1. In the web app, select My/Team FinanceCheques.
  2. Click on the green Add Assignment button.
  3. Select whether you wish to enter a Request or Message.
  4. In the section Information about the trip fill in as Traveler the person you want to a receipt to create.
  1. Under My Finances – Treasury – Applications/Reports, click on Application/Report.
  2. Click and select Send copy to other passengers.
  3. Select a user and enter Send copy.
    .

The difference between an application and a report

It is an agenda combining the statements of work trip with the attached expenses and the calculation of meals, pocket money and any reimbursements for the trip. You can create, approve and bill receipts in the app. The whole process is done using two forms.

  1. You fill in the application form before your trip. You will describe the planned route and, if applicable, request an allowance.
  2. You fill in the mission report on the way. You can create it from the Business Travel Request.

Two-factor verification of Fidoo card payments on the Internet

Confirm Fidoo card payment online in the Fidoo mobile app

The moment you enter your details in the merchant’s payment gateway zFidoo cards, you can be prompted to confirm payment in the mobile or desktop version of the app Fidoo.

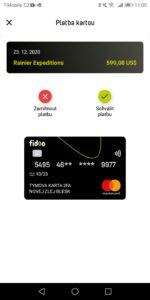
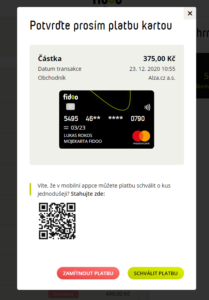
  1. After entering your Fidoo card details in the merchant’s payment gateway, you will receive a notification on your mobile phone to confirm the card payment.
  2. When you open the notification, you will see details of the payment you are making and options to reject or approve the payment.


    Click on “Approve Payment” to proceed to authorize and verify the payment.
    Click on “Reject Payment” or the cross in the top corner of the window to reject the payment.
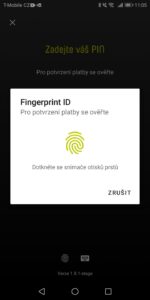
  3. Now comes the verification, which you can do using:
    a) fingerprint, facial scan – follow the instructions on your phone as you are used to.

    b) entering your PIN
    – if your phone does not support biometrics or you have chosen not to use it, follow the instructions on your mobile phone. Your authentication will be done using the PIN or other code you use for your authentication.
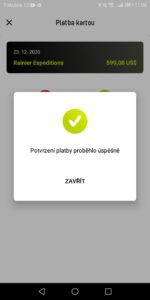
  4. After successfully verifying all required elements on your mobile phone, confirm the payment.

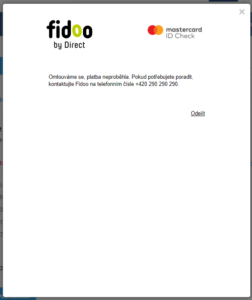
Failure to make payment

We will not make payment if one of the following situations occurs:

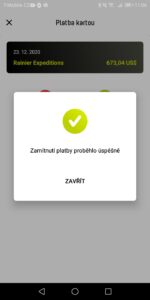
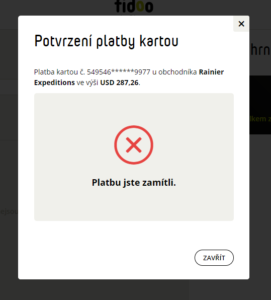
  • Select “Reject payment” or close the payment confirmation window with a cross.
  • 5 minutes have passed since the payment confirmation started and you have not decided whether to confirm or reject the payment.
  • The correct PIN has not been entered and you have already exhausted five attempts.

In this case, we will show you information about the refusal of payment. This information can also be found in the merchant’s payment gateway.

In the event that you receive to confirm a payment that you have not entered, we recommend the card immediately lock or block, or contact our client centre.

Confirm Fidoo card payments online in the Fidoo web app

The moment you enter the details from the merchant’s payment gatewayFidoo card, you will be prompted to confirm the payment in the mobile or desktop version of the app Fidoo. In this tutorial you will find out how to confirm your payment in the computer application Fidoo available at

https://fidoo.com/app


.

  1. Log in to Fidoo as you are used to at https://fidoo.com/app.
  2. After logging in, you will be presented with a window where you have the option to approve or reject the payment.

    Click on “Approve Payment” to proceed to verify and confirm the payment.
    Click on “Reject Payment” or close the window using the cross at the top right to reject the payment.

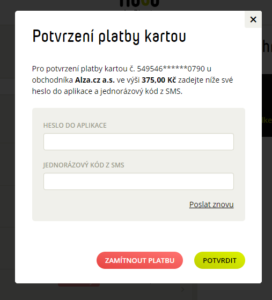
  3. In the next step of the payment confirmation, you will be asked to enter your Fidoo password and the one-time code from the SMS. We will send you an SMS to your phone number listed in the Fidoo app.

    Click on “Confirm” to proceed to payment confirmation.
    Click on “Reject Payment” or close the window using the cross at the top right to reject the payment.

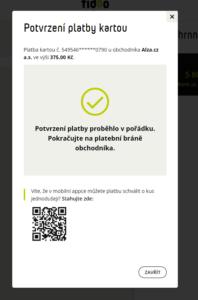
  4. After you have successfully entered the password to the app and the code from the SMS, you will successfully confirm the payment.
  5. Now proceed to the merchant’s website.

Failure to make payment

We will not make payment if one of the following situations occurs:

  • Select “Reject payment” or close the payment confirmation window with a cross.
  • 5 minutes have passed since the payment confirmation started and you have not decided whether to confirm or reject the payment.
  • You have not entered the correct app password and/or SMS code and have already exhausted five attempts.

In this case, we will display a message to reject the payment or the time limit for payment confirmation has expired.

V

If you receive a payment for confirmation that you have not entered, we recommend that you lock or block the card immediately


, or contact our client centre


.


Frequently asked questions about two-factor authentication for online payments

Notifications to confirm a card transaction in the web app will appear on your profile at the company whose card you want to pay with. You can switch the company in the top right corner.

In the mobile app, confirmation notifications appear regardless of the profile you have set up at the time, so you don’t have to switch between companies.

Confirmation by notification is only done in the current version of the Fidoo mobile app for both iOS and Android. We recommend downloading the latest version and having notifications enabled.

The second reason may be that the merchant (the e-shop) does not require this method of verification.

Contact the Main Application Administrator and check the accuracy of your phone contact.

Navigation and basics

Common page elements

Some page elements are available in most of the application pages

1 – Application switcher
2 – Navigation menu
3 – Main application area
4 – User options
5 – Company context switcher

Homepage

Your homepage gives you a quick overview of your FX account, balances in your currency wallets, and your recent transactions and provides you with quick links to the main functions.

1 – Main actions
2 – Currency wallets
3 – Recent transactions

Navigation

Navigation menu

Access functions in the current app via the app’s navigation menu

Switch between applications

Use the app drawer icon in the top bar to switch between product and servicing applications available for you in the online portal.

Switch company context

Your user account can be linked to several company client accounts.

  1. Click on the company switcher in the top-right corner to switch between your companies
  2. When you log in to the application, the last used company context is normally shown.

Manage user preferences

  1. Click on the user icon in the top right corner to access user options
  2. Select My account to maintain your user profile and preferences

Set user language

In the My Account section:

  1. Select from the list of available languages and click on the Save button.
  2. Return to the main application via the application switcher in the top bar.

Log out

  1. Click on the user icon in the top right corner to access user options. Select Log out to exit the application.
  2. Select Log out to exit the application.

Frequently asked questions

See your current company context in the company switcher in the top right corner of the page.

Return to the main FX application via the application switcher in the top bar.

Access and login

Get access to the online portal

  1. Locate the invitation e-mail in your inbox, with the subject “Activate your account for FX and International payments”
  2. Open the activation link in the e-mail in your browser
  3. Follow the on-screen instructions to verify your identity by entering an SMS code sent to the phone registered with your invitation
  4. Set your password according to the on-screen instructions

Log in to the web application

  1. Open the online platform application app.fidoo.com/fox in your browser.
  2. Verify your identity with an SMS code sent to your phone

First steps in the application

After signup or login, you should see the homepage of your company’s FX account.

Setup new password

  1. Click the Forgot Password? link on the Login page and follow the on-screen instructions
  2. Verify your e-mail by entering a code sent to your mailbox.
  3. Verify your phone number via a code from SMS
  4. Set a new password

Frequently asked questions

  • Check your SPAM or Junk folder
  • Check if you have provided the correct e-mail
  • Contact customer support

The validity of the invitation is seven days. If the invitation has expired before you managed to activate your account, please contact our customer support to request a new invitation.

Refresh the browser page, or log in again. If the problem persists, contact our customer support.

Please get in touch with our customer support

The verification codes are valid for 5 minutes. Please check the time of receipt of the e-mail or SMS and try again.

Use the Forgot password? link on the login screen and follow the on-screen instructions.

Add a card to your Apple Wallet

  1. Launch the Apple Wallet app on your device (Apple Wallet) :apple_wallet:.
  2. In the Wallet app, click

    :plus_icon:

    .
  3. Tap Debit or credit card to add a Fidoo card.
  4. Click Continue.
  5. Follow the on-screen procedure to add a new card.
  6. If you have an Apple Watch paired, you’ll get the option to add the card to your watch at the same time.

For more detailed information on setting up Apple Pay, follow this link.

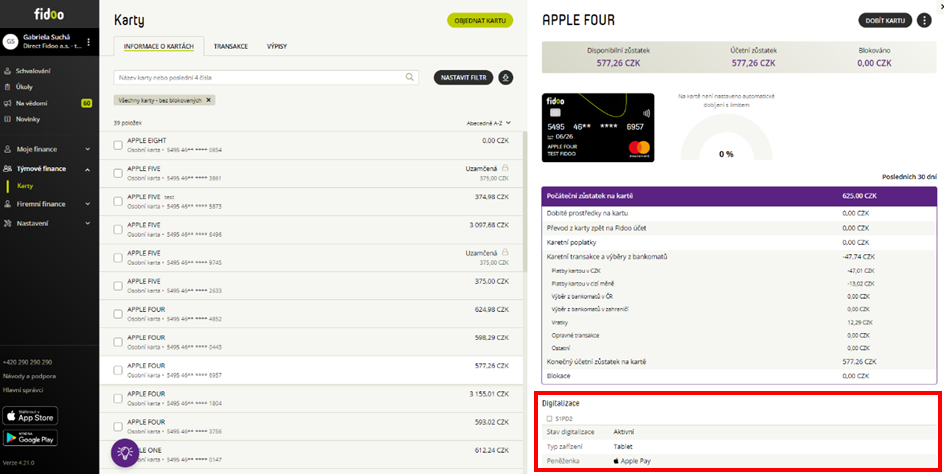
Displaying data about the digitisation of the Fidoo card

In the Fidoo web application, you can find information about the digitisation of the Fidoo card in the Cards section – Card Information tab in the details of the selected card:

Information about digitised cards is not available in the Fidoo mobile app. But you’ll find them in Apple Wallet on your device.

Conditions for digitising your Fidoo card

    • The physical Fidoo card must be:

      • personal (not team)

      • Active

    • The Fidoo card insertion device must:

      • support NFC

      • screen lock to be set on it – the phone unlocks after authentication (Face ID, Touch ID, PIN)

      • be iPhone with Face ID, iPhone models with Touch ID except iPhone 5S or iPad Pro, iPad Air, iPad and iPad mini with Touch ID or Face ID, or Apple Watch Series 1 and later

      • have iOS 14 and above to insert the card directly from the Fidoo mobile app

      • contain max. 10 digitised cards

Frequently asked questions

The Team Card cannot be used with Apple Pay. Only the personal Fidoo card can be digitised.

Yes, you can conveniently pay with your Fidoo card through this watch.