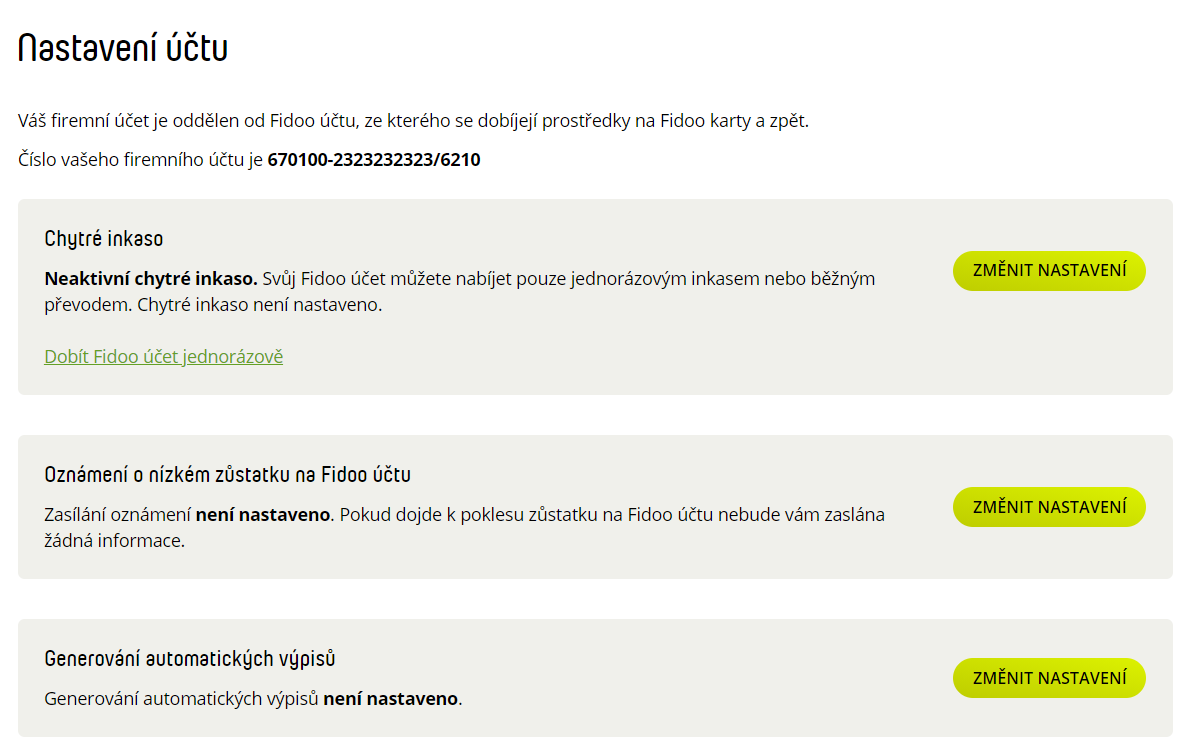
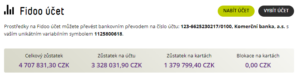
- Section Settings – Company – Fidoo account.
Click Change settings to make the following changes:
- collections,
- notification of the balance on your Fidoo account,
- generation of automatic Fidoo account statements.
Click Change settings to make the following changes:
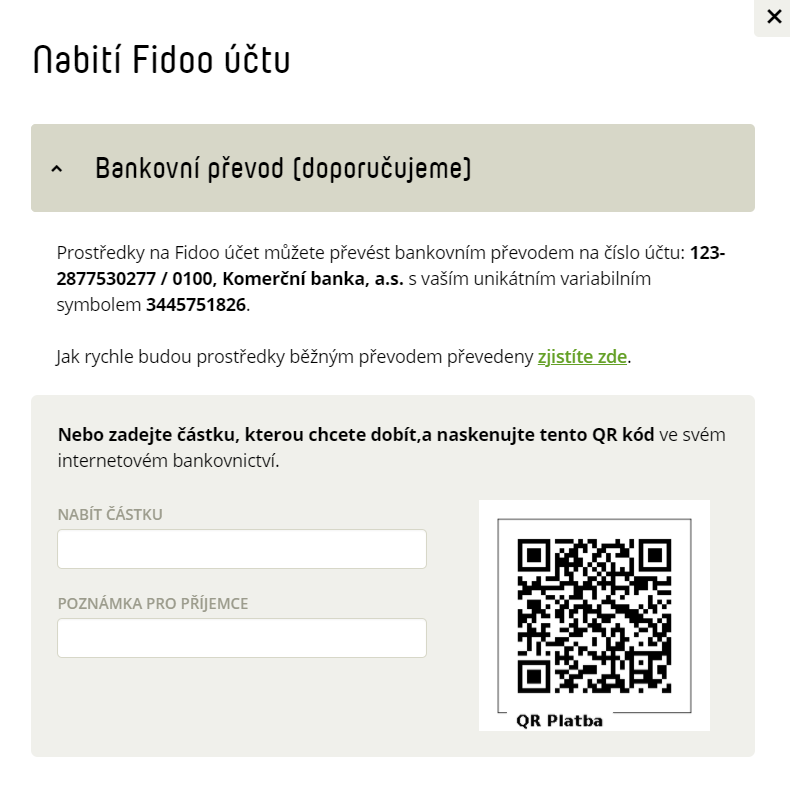
or
Log in to your bank and enter the payment order.

When you open the logbook, the current month and vehicle list will be displayed. To switch to another month, click on the arrows ![]() placed next to the name of the month.
placed next to the name of the month.
When filling in the logbook, the application saves continuously, so there is no need to click the Save button, which is not found in this section.

In the BETA version it is possible to sign the logbook without all the necessary data required by law. Only distance or speedometer information is required. When signing the logbook, you will get a message that the logbook cannot be signed for some reason or that some journeys are not complete according to the government regulation. You can verify this information by clicking on the bulb![]() which will be displayed next to the route of the incomplete journey, but even if you don’t correct the errors, you can sign the logbook.
which will be displayed next to the route of the incomplete journey, but even if you don’t correct the errors, you can sign the logbook.
Section Settings – Vehicles.
Manual settings
Import vehicle list
Select the format and click Export.
The vehicle is active:
The vehicle is deactivated:
In the BETA version, it is possible to validate the logbook without all the necessary data required by law. Only distance or speedometer information is required. When confirming the logbook, a message will be displayed stating that the logbook cannot be confirmed for some reason or that some journeys are not complete according to government regulations. You can verify this information by clicking on the bulb![]() that appears next to the route of an incomplete journey, but even if you don’t correct the errors, you can still validate the logbook.
that appears next to the route of an incomplete journey, but even if you don’t correct the errors, you can still validate the logbook.
Section Settings – Vehicles.
Manual settings
Select Add Vehicle (top centre), fill in the necessary details and Save.
Import vehicle list
Click on
– Import vehicles.
Download and fill in the prepared sample file.
Click Choose File, find the file on your computer and select Import.

Yes, you will. Two-factor authentication for login requires only the receipt of an SMS message, which any mobile phone can handle.
If you do not want to fill in a verification code in addition to your login name and password every time you log in to Fidoo, you can enable the Login without SMS verification feature in the app for 90 days.
You can find out what strong authentication is for and how to set it up on this page.
Feel free to enter your private phone number. It will only be used to receive SMS authorisation codes and we at Fidoo will not use it to send you any commercial or marketing messages unless you have given us your consent to do so. Your phone number is information that only you and your company’s Fidoo Application Lead Administrator have access to.
You can’t do it without a cell phone. If you haven’t needed to log into the Fidoo app or pay online yet, then nothing has really changed for you.
We recommend entering your private mobile phone number.
In principle, there are no technical limitations; the device can be, for example, a desktop computer, a laptop, but also a tablet or a mobile phone with internet access.
Cookies are one element of identification of such a device. Therefore, after deleting them, you need to mark the device as trusted again.
Yes, a single device can designate any number of different users as trusted under its user accounts.
If you are logging into Online Banking from a device (computer, tablet, laptop, mobile phone, etc.) that is not added to your trusted devices, we will offer you the option to add it to your trusted devices directly on the login screen. You can then just confirm this by SMS. The next time you log in from this device, all you have to do is enter your internet banking ID and password.
Contact the Main Application Administrator and check the accuracy of your phone contact.
We will consider the device you designate as secure (trusted) and for 90 days you can log in with your username and password without having to enter the SMS verification code sent to your mobile phone. After 90 days, you must re-designate the device as trusted and confirm this choice with an SMS verification code.