Search
Close this search box.

Correction of expenditure

An issue that you have submitted for approval may be rejected. In this case, you will receive an email with a rejection message and the reason. The issue will reappear in the application as an open issue with a returned Reimbursed expense. The repair process is the same as the modification process.

Web app

  1. My Finances – Expenses – click on the expense and select Edit.
  2. Fill in the necessary information and select Save and submit for approval.

Mobile app

  1. Bottom menu – Expenses – click on the expense and select Edit Expense.
  2. Fill in the necessary data and confirm with the check mark (top right).
  3. Enter Submit for approval.

FAQs on correcting expenses

You can edit an issue when it is in the Open status – i.e. not sent to a supervisor or accountant for approval. If the expense shows as Approved, contact the person in your company with the Accounting role who can reject the expense. This will return its status to Open and you will be able to edit the expense, or in the case of a cash expense you have the option to delete the expense.
Creating a Bulk Assignment

Repeat of a one-day business trip

  1. My Finance – Treasury section.
  2. Create a Request or Report, or select an existing one, click Settings icon and enter Edit Request/Report.
  3. In the Application/Report detail, click on Settings icon under Route and select Repeat Route
    or enter directly under the route listed.
  4. In the calendar, enter the days when the trip is repeated and confirm with the Repeat button.
  5. Save the Bulk Request/Message or Save and Submit for approval.

Adding a trip to a bulk transfer

  1. My Finances – Honours – select the open Application/Message you want to add a journey to.
  2. Click on Settings icon and select Edit Request/Report.
  3. In the Application/Report detail, click on Settings icon under Route (Paths) and select Add Path Before/Add Path After.
  4. Complete the path and Save or Save and Submit the bulk Request/Message for approval.

Interruption of a business trip

  1. My section
    Finance – Treasury
  2. Create the first leg of the journey by entering the departure date and location (point A) and the date and place of arrival (point B).
  3. For the last part of the route (point C) click on to delete the end of the route (it is possible to have multiple waypoints before breaking the route).
  4. Choose
    Add another trip
    and continue where you left off on the previous trip, select the date and time to restart the trip and continue filling in until the arrival date and location.
  5. Bulk Request/Message
    Save
    or
    Save and send for approval
    .

Deleting a path from a bulk transfer

  1. My Finances – Honours – select the Application/Message from which you want to remove the path.
  2. Click on Settings icon under Route and select Edit Request/Report.
  3. In the Requests/Messages detail, click on Settings icon next to the route you want to delete and select Delete Route or Expand the route you want to delete and select Delete Route directly below the route.

Frequently asked questions about creating messages for assignment

How do I enter multiple days at once on a repeat trip?

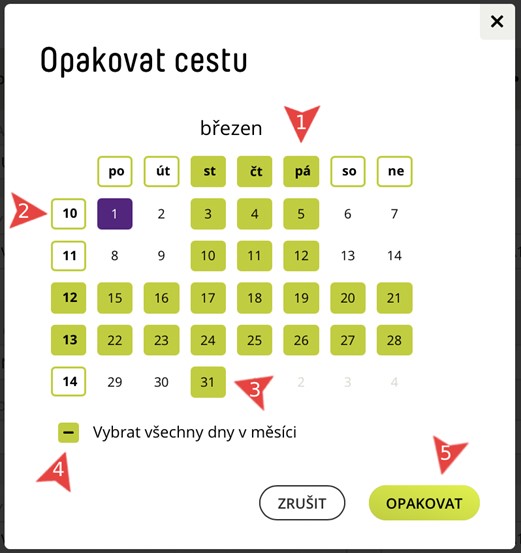
The calendar also allows you to select or deselect:

  • all Mondays / Tuesdays / Wednesdays… by clicking on the name of the day of the week (1),
  • the whole week by clicking on the week number (2),
  • select a specific day by clicking on a specific date (3),
  • all days of the month (4).

Example: selection of all working days in a month

  1. Click on “Select all days of the month”, this will select the whole month.
  2. Click on the name of the days of the week “Sat” and “Sun” to deselect Saturdays and Sundays.
  3. You can then deselect any other day of the month by clicking on that day.


Example: selecting every Tuesday of the month

  1. Click on the name of the day of the week “Tue”, this will mark all Tuesdays of the week.


Example: selection of all working days in 12. of the week

  1. Click on the week number 12 to mark all days of the week.
  2. Click on day 20 and 21 to deselect weekend days.

The calendar also allows you to select or deselect:

  • all Mondays / Tuesdays / Wednesdays… by clicking on the name of the day of the week (1),
  • the whole week by clicking on the week number (2),
  • select a specific day by clicking on a specific date (3),
  • all days of the month (4).

Example: selection of all working days in a month

  1. Click on “Select all days of the month”, this will select the whole month.
  2. Click on the name of the days of the week “Sat” and “Sun” to deselect Saturdays and Sundays.
  3. You can then deselect any other day of the month by clicking on that day.


Example: selecting every Tuesday of the month

  1. Click on the name of the day of the week “Tue” to mark all Tuesdays of the week.


Example: selection of all working days in 12. of the week

  1. Click on the week number 12 to mark all days of the week.
  2. Click on day 20 and 21 to deselect weekend days.